Preparing · Chapter 1: Getting to Know the Piano
Finding the White and Black Keys
If you go to your instrument and look down at the keys, you’ll notice that some are white and some are black, and that they are arranged in a pattern like this:
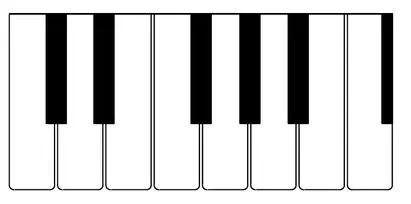
You’ll also notice that the black keys are grouped together, in sets of “two” and “three,” repeatedly up and down the keyboard. This is very handy (not to say essential!) as it enables us to identify the notes, and where we are on the keyboard. Or, to put it another way: if the keys just alternated “white-black-white-black” all the way up and down the keyboard, we’d be hopelessly lost (and I would probably be in another line of work…!).
Next, we’re going to be introduced to the music alphabet. This refers to the letters A, B, C, D, E, F, and G that we use to label the white keys. You’ll never need to go beyond the letter G, as we “wrap around” again to use the letter A. So, if someone asks you to find an H on the piano keyboard, you can safely assume that he or she is kidding around (or that they’re in desperate need of this book!). Now we’ll look at the previous diagram again, this time with the letters of the music alphabet added:
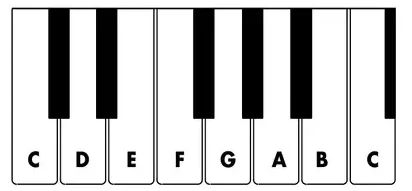
You’ll notice that this diagram starts and ends on the note C. It just so happens that the white keys on the keyboard collectively make up a C major scale (much more about this later on!). As we said before, notice that after we use the letter name G, we start at the beginning of the music alphabet again to use the letter name A. This set of seven letter names repeats all the way up (to the right, or forwards in the alphabet) and down (to the left, or backwards in the alphabet) the keyboard.
Now we are going to use the position of each white key relative to the black keys (i.e., to the sets of “two” or “three” black keys) to identify each white key:
- The note C is always to the left of the group of 2 black keys.
- The note D is always in the middle of the group of 2 black keys.
- The note E is always to the right of the group of 2 black keys.
- The note F is always to the left of the group of 3 black keys.
- The note G is always between the 1st and 2nd key within the group of 3 black keys.
- The note A is always between the 2nd and 3rd key within the group of 3 black keys.
- The note B is always to the right of the group of 3 black keys.
Now we’ll play a fun exercise to help you locate where these white keys are on the keyboard. Start with any letter of the music alphabet, let’s say D. Then find and play the lowest (leftmost) D on your keyboard. Once you’ve done that, play each D successively moving up the keyboard, ending with the highest D. Next, repeat this exercise with all letter names (jump around the alphabet too!) until you’ve covered all the notes!
Next, we’ll look at the note names for the black keys on the keyboard. These will use the same letter names (A up to G), but with either a “sharp” or “flat” sign added:
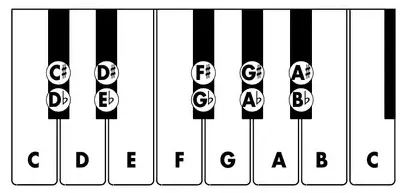
The term sharp (♯) means to raise the pitch of the note, and the term flat (♭) means to lower the pitch. When we move to the right on the keyboard, the notes become progressively higher in pitch. When we move to the left on the keyboard, the notes become progressively lower.
Note that each black key has been given two names, for example, the black key in between C and D can be called either C♯ (C sharp) or D♭ (D flat). In other words, we can sharp (or raise) the pitch C to get to C♯, or we can flat (or lower) the pitch D to get to D♭.
The term enharmonic is used to describe the same pitch having more than one name. For example, the note names C♯ and D♭ are enharmonic equivalents. (You can impress your friends at parties by talking about enharmonics!)
You might be thinking, why would we need to have more than one name for the same note? Wouldn’t one name be enough? Well, believe it or not, depending on which key or scale we are using (much more about keys and scales later on!), we may prefer to use one name or the other—stay tuned!
Now we’ll introduce our first music interval term, the half step. If we move from any key on the keyboard to the nearest note (black or white) on the right or left, this distance is referred to as a half step interval. For example, if we start on the note C, the next highest note (i.e., nearest note to the right) is the black key between C and D. This black key, known as C♯ or D♭, is therefore a half step higher than the note C.
When we sharp a note (by adding the “♯” suffix to the note name), we are raising the pitch by a half step, and when we flat a note (by adding the “♭” suffix to the note name) we are lowering the pitch by a half step.
Another interval term we’ll learn about is the octave. This is the distance between any note and the next-occurring note of the same name, either to the right (higher) or to the left (lower). For example, in the keyboard diagram, the interval between the C on the left and the C on the right is an octave. Go ahead and count the number of octaves on your instrument. On an acoustic piano and most digital pianos, you’ll have a little over seven octaves to play with.
You may also notice that certain pairs of white keys on the keyboard don’t have a black key in between them (a consequence of the black keys being grouped into sets of “two” and “three” as we have seen). E–F and B–C, the two pairs of white keys, are a half step apart.
If you count, starting from the C on the left of the diagram to the C on the right, you’ll find that there are twelve half steps in one octave. This is a fundamental relationship upon which Western music is generally based!