Playing, Part 1 · Chapter 8: Songs in Extended F and G Positions
Moving Hand Positions While Playing
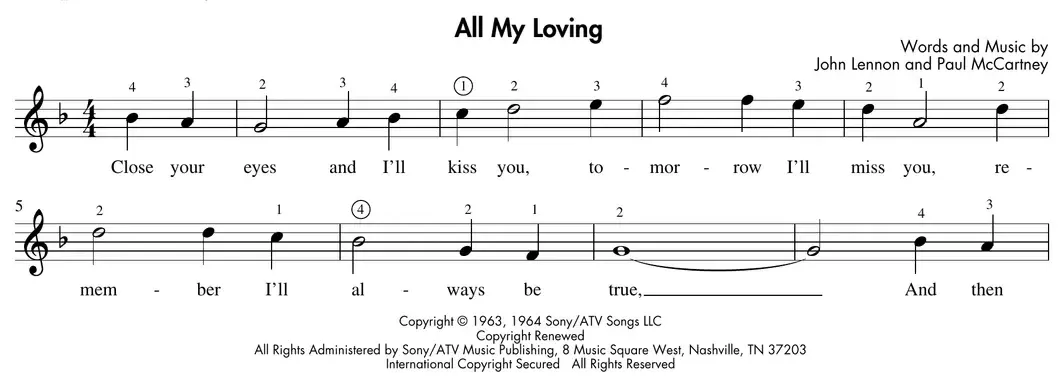
The next stage beyond simple extensions of hand positions is to change to new hand positions entirely, while playing. This will be needed if the music has a greater range (distance between the highest and lowest notes) than the songs we have seen so far. Our first example of this is the famous Beatles’ song “All My Loving.” Remember playing the scales in Chapter 7? Well, now’s your chance to use the thumb turn and other crossing over of the fingers. The fingering for this song follows the fingering for playing the F major scale. The finger numbers have been circled in the places where you need to turn under or cross over.
All My Loving Words and Music by John Lennon and Paul McCartney
The Beatles
This is the first of several Beatles’ songs that we’ll be looking at in this book. Beatles’ songs are fun to play on the piano, as they have great melodies, interesting chord progressions, and they are generally not too difficult to play. Here are ten more Beatles’ songs you should check out. Get the sheet music, check out the recordings, and have fun playing these classics!
- The Fool on the Hill
- For No One
- Here, There and Everywhere
- Hey Jude
- I Will
- Nowhere Man
- We Can Work It Out
- With a Little Help from My Friends
- You’ve Got to Hide Your Love Away
Michelle Photo courtesy of Photofest, Inc. The Beatles
When talking about a song like the Beatles’ tune “All My Loving,” it is useful to make use of the measure numbers shown at the beginning of each staff system, from the second line, onward. In the first line, we have a pickup measure (with just two beats) and then four full measures, which are measure numbers 1 through 4. Then the number “5” is shown at the beginning of the second staff system, reminding us that this line begins with the fifth measure of the song. Next, the number “9” is shown at the beginning of the third line, and so on.
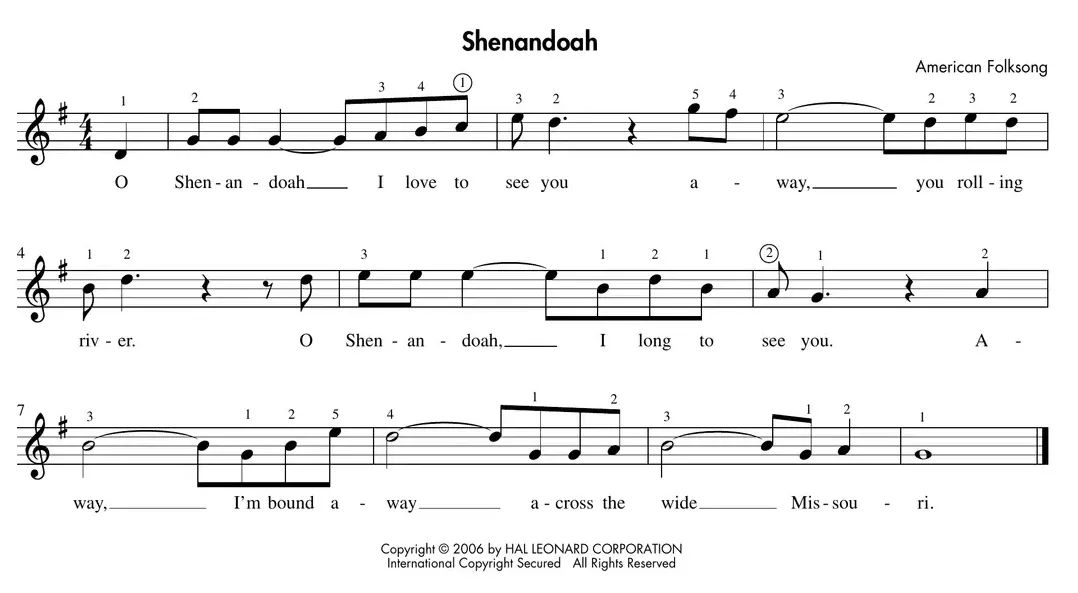
The last song in this chapter is the famous folk tune “Shenandoah,” which again requires changes of hand position. The circled finger numbers show places where you need to employ the thumb turn or to cross over a finger. Also be mindful of places where you must stretch your fingers, like the first two notes of the song. Always know what the notes are first (i.e., what the letter names are, and what keys on the keyboard need to be played), and then look to the finger numbers to play the notes with the appropriate fingers. If you rely too much on finger numbers alone, you may find that you’re using the correct finger, but not playing the correct note. For example, if you’re about to play a note, and the number above it is a “2,” don’t just automatically press down finger 2. Your index finger may not be sitting on the correct key at that moment.
Know what note you need first, and then make sure finger 2 moves to that note and plays it. This is one of the main challenges to playing songs in extended hand positions, and especially in performing tunes where the hand positions change. Listen to track 20 and notice the even tempo, without pause. Make sure that when you execute the thumb turns and finger crossings, the music keeps going continuously. Try playing along to help maintain that steady tempo.
Loading audio…