Playing, Part 1 · Chapter 9: More Time Signatures
Introducing 3/4 Time
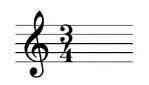
The next most common time signature after 4/4 time is 3/4 time, also referred to as waltz time (as the three-beats-per-measure rhythm is needed for waltzing). When we see the 3/4 time signature, we will count: 1, 2, 3, 1, 2, 3, etc. This may take some time to get used to after playing many songs in 4/4, but just remember to leave out that “4” when you count.
The waltz dance form first appeared in the late 18th century, and became very popular in the 19th century, mainly due to the Viennese composers Johann Strauss and Joseph Lanner. Perhaps the most famous waltz from this period is “The Blue Danube” by Strauss, written in 1867.
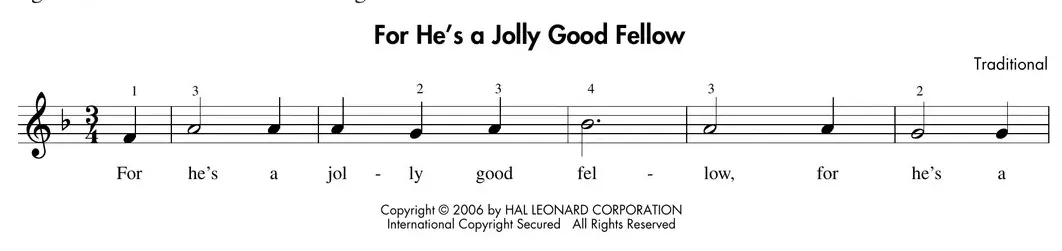
Note the top number (3) indicating there are three beats in each measure. Many traditional and folk tunes also use 3/4 time, as in the following example, “For He’s a Jolly Good Fellow,” which uses an extended F position in the right hand, with finger 2 moving to A in measure 9 in order for the pinkie to stretch up to D in the third line. In measure 14, the fingers will stretch again from 3 on B♭ down to finger 2 on G.

Loading audio…
Once you’ve practiced “For He’s a Jolly Good Fellow,” and you think you have all the fingerings learned, have a listen to track 21. Now play along with the recording, making sure the finger stretches don’t hold up the tempo.
Note the fermata sign, the bird’s eye-looking thing on the first D in measure 12. This indicates to hold the note longer than its normal value. A note under a fermata is a kind of resting place, where the beat stops. When you’re ready and satisfied that you’ve held it long enough, resume with the next note at the regular tempo.
When playing this song, count out each measure (1, 2, 3, 1, 2, 3, etc.) as needed. Notice that we are again starting with a pickup measure, containing only one beat. In 3/4 time, this would then fall on beat 3 (the last beat) of the measure (i.e., we would rest on beats 1 and 2).
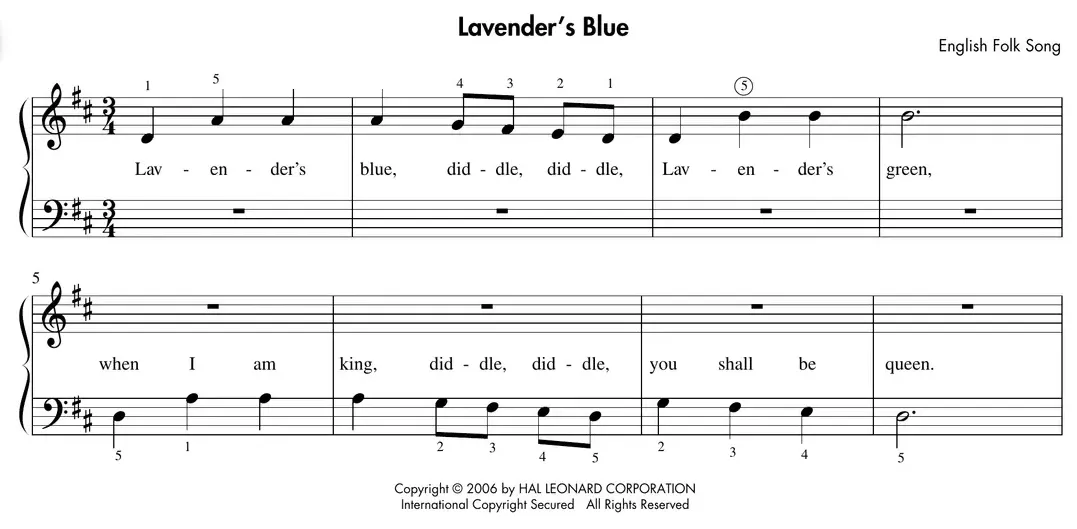
On to another traditional tune in 3/4 time, now in the new key of D major. In Chapter 7 we saw that the key signature for D major was two sharps, F♯ and C♯ . So these notes need to be sharped whenever they occur. For this song, you can create a D Position in the right hand, with the thumb resting on the D above middle C, and your pinkie on the A. In your left hand, the pinkie should sit on the D below middle C and the thumb on the A below middle C. Make sure your third finger is on the black key of F♯ in both hands, as required by the key signature. We also need to extend this hand position to reach the note B, at the end of lines 1 and 3.

Loading audio…
Once you’ve had some time to practice “Lavender’s Blue,” listen to track 22, and then play along. Were you able to keep the song going while the hands changed from right to left and back to right? Playing with the recording may help you become aware of pauses you weren’t aware of when you played the song on your own. After you’ve played along with the recording a few times, try again without it.